

Are you a beginner looking to cut perfect shapes on wood? Understanding band saw blades is the first step towards smooth and precise cuts. You need to consider tooth count, size, blade width, and more to get the desired results.
In this guide, you’ll learn all of it and more.
Introduction
Band saw blades are versatile cutting tools used in a variety of settings, from home workshops to industrial manufacturing plants. Usually made out of metal, they are composed of teeth positioned in an alternating pattern along a flexible band. Different types of blades are used for different functions, depending on the kind of material being cut. This guide provides an overview of the basic elements and types of band saw blades to help you choose the right blade for your application.
The main components that make up a band saw blade include: teeth (the ridged cutting edges at intervals along the blade); set (the angle at which each tooth is positioned); gullet (a recess between each tooth); back (the flat surface behind the teeth); and width (measured from tip to tip). The length and number of teeth determine which type of blade is best suited for your project. Generally, blades come in three widths: narrow for accurate tight-radius cuts; regular for general-purpose curved cutting; and wide band for fast straight cuts.

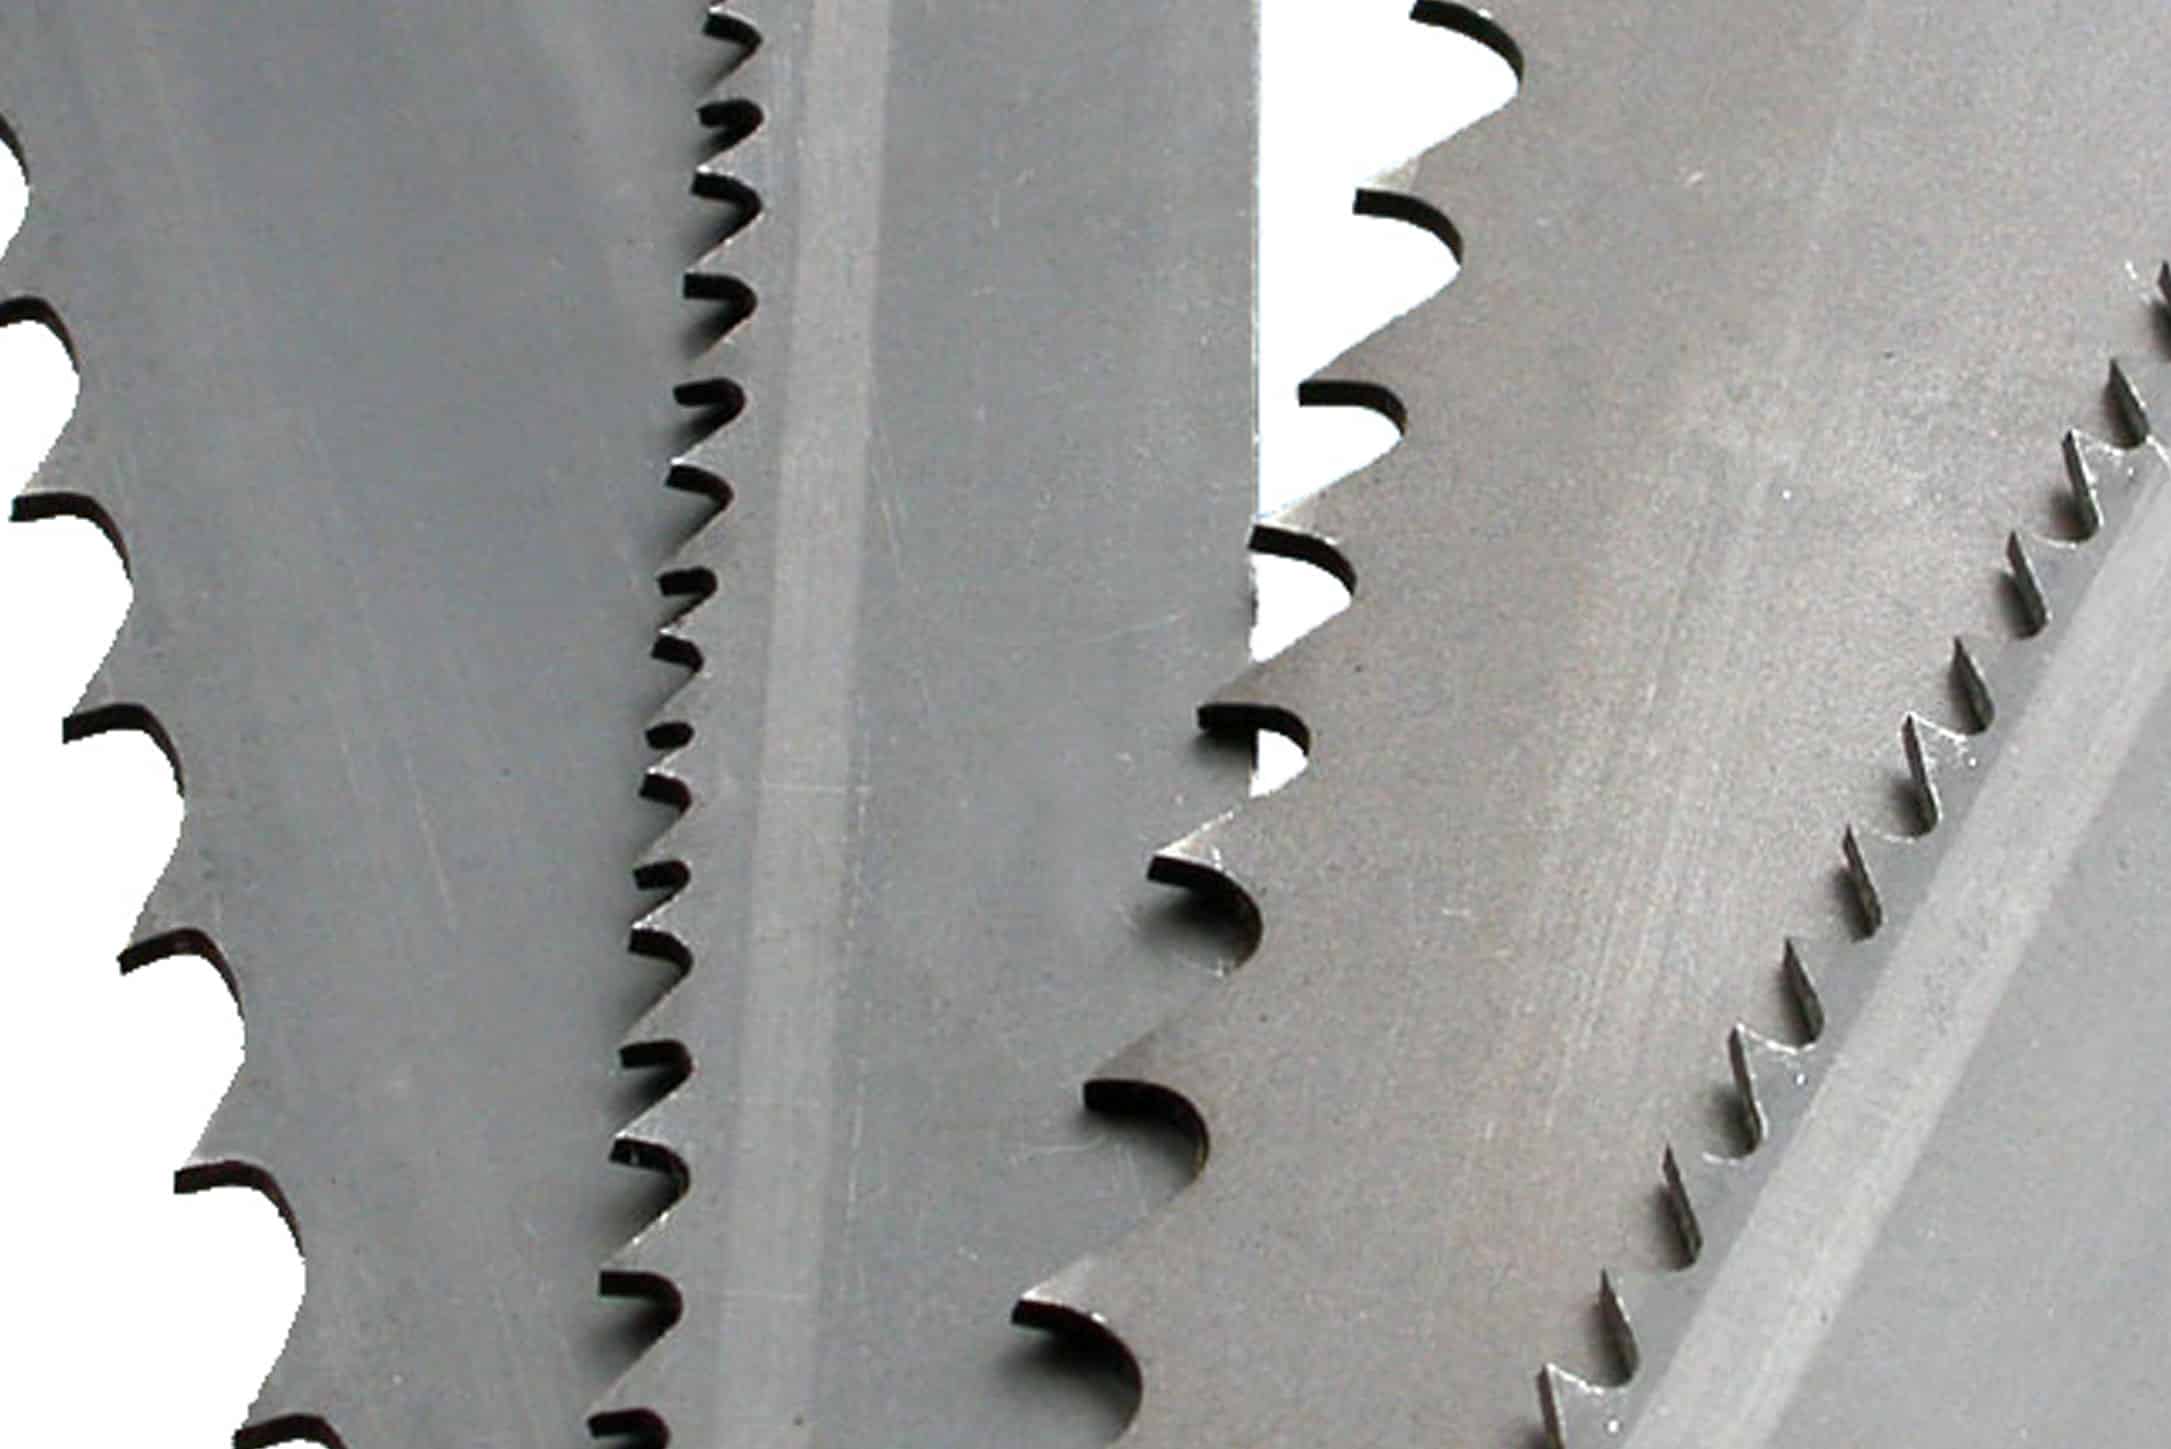
Types of Band Saw Blades
The choice of a band saw blade depends on the material being cut and the sort of cut required. There are a variety of types, each designed for different applications. Some blades are designed for straight, detailed cutting while others excel in curved work. Below is a brief overview of some commonly used blades.
- General Purpose Blades: This type is most suitable for soft woods and non-ferrous materials like aluminum and brass. They can also be used to make curved cuts but may chip when used on hardwood surfaces or when cutting at an improper angle.
- Hook Tooth Blades: These are generally used to cut hardwoods, metals, plastics and composites, as they have larger teeth that can penetrate harder materials more easily than with general purpose blades. These hook tooth blades work best in straight cuts and perform best when cutting against the grain of the material being cut.
- Skip Tooth Blades: They are quite similar to hook tooth blades but with much fewer teeth per inch which makes them suitable for finishing cuts as well as making curved or intricate cuts in softer materials such as hardwoods, plastics and composites. The reduced number of teeth ensures that burning or chipping is minimized during use on harder surfaces due to their slower cutting speed as compared to hook tooth blades.
- Positive Rake Blades: Positive rake blades also have fewer teeth per inch than other types making them better suited for making curves or intricate cuts in harder materials such as metals and composites without snagging or skipping teeth during operation. The specialized design allows for even pressure across the blade which helps reduce blade stress overall resulting in longer life span and superior performance over time.
Blade Width
The blade width is an important factor in selecting the right band saw blade for your needs. A wider blade give you more material-cutting capacity, allowing you to cut larger pieces. Wider blades also provide a smoother cutting surface, reducing friction and producing better results. However, wide blades require more horsepower to run and can add cost to your operations. Consider your needs when selecting the correct size of blade for your application.
For finer materials such as aluminum or stainless steel, choose a blade with a small number of teeth per inch (TPI). For coarser cuts on harder materials such as mild steel, select a larger TPI number to enable fine-cutting accuracy without overloading the motor or tearing the material into small pieces.
In addition to width and TPI selection, different types of blades are available depending on your application needs. Bimetal blades are tougher and can handle harsher cuts; however they tend to be more expensive than carbon-steel blades which have excellent cutting speed but may struggle with harder materials such as titanium or hardened steels at higher temperatures. If you’re unsure which type of blade works best in your situation – seek guidance from an experienced professional!
Tooth Configuration
The tooth configuration of a saw blade refers to the number, shape and size of teeth on the cutting edge of the blade. This is the most important factor when choosing a saw blade as it determines how fast and how cleanly a given material is cut.
Generally, there are two basic types of teeth configurations: standard/straight (straight teeth which mesh together as the blade rotates), and alternate set (one straight tooth has an angled neighbor). The number, shape, size and set of the teeth decides what type of material and what speed needs to be used for optimal results.
Standard tooth blades are suitable for most general-purpose applications such as cutting softwoods, hardwoods, particleboard and plastic plywood. The higher-diameter blades require fewer teeth for smoother operation and easier feeding.
Alternate set blades work better when cutting harder materials such as non-ferrous metals or plastics where you need increased chip clearance or aggressive cutting action. They also reduce vibration while providing excellent finish cuts on round stock materials such as pipes or tubing.
Blade Material
Band saw blades are made from a variety of materials, and the type of material used will have an impact on the performance of the blade. The most commonly used band saw blade materials are carbon tool steel, hardened high-speed steel, and industrial grade cobalt. Each of these materials has specific characteristics that influence its performance when cutting.
For general purpose applications, carbon tool steel is ideal. It is easy to maintain and sharpen, as well as having excellent wear resistance to cutting all types of wood, plastics, metals and nonmetallic products. High-speed steel blades are more durable than regular carbon tools steels and offer better resistance when cutting abrasive materials like aluminum or stainless steel. Cobalt blades are designed for heavy duty applications where further increased heat resistancy is needed due to higher temperatures generated during long cuts in thick or hard materials such as high alloy steels or titanium alloys. Additionally, tungsten carbide tipped band saw blades are available for cutting difficult metals with superior wear characteristics over standard carbon tool steels.
Installing and Setting Up a Band Saw Blade
Installing and setting up a band saw blade on your bandsaw is straightforward. The process consists of properly sizing the blade, making sure it is tensioned correctly, guiding and tracking it as needed, and making any necessary adjustments based on the type of material you’re working with.
Sizing: The size required for the blade will depend on your saw’s throat depth, wheel diameter, wheel arbor size, arbor shaft length, and pin location. Make sure to check that the width of the blade is wide enough to cut your material if you are cutting curved or angled shapes.
Tension: Before installing the blade onto your saw’s wheel assembly, you’ll want to make sure it is properly tensioned as this ensures that it makes contact with both guides while reducing vibration. This can be done either manually (using a flat-head screwdriver) or automatically (using an adjustable wrench). Once tensioned correctly, secure the ends of the blade onto each wheel flange using washers and nuts included in your band saw kit. As always, use eye protection during this step.
Guiding: For best results when cutting intricate shapes or angles in wood or other material like metal pipes and tubing, you’ll need to guide your saw correctly since maintaining control of a square cut is difficult when not guiding accurately around curves and angles. To do this correctly start by making sure both top and side guides are lined up parallel to each other near where you plan to make your initial cut before lowering them as needed as you progress along an angled line or left-to-right curve. Be sure to also ensure that both guides maintain constant contact with the sides of their respective wheels while turning – using clamps here can be particularly handy if necessary!
Tracking: It’s also important that you keep track of how well a band saw blade tracks – meaning how well or poorly it stays aligned with guides over time – by checking periodically throughout use for signs of excessive wobbling in cuts or misaligned geometry due to any imperfections occurring in its rotation process such as warping caused by heat buildup near a specific tooth node on repeat passes at certain locations across a board edge/surface profile angle/etc.. To do this simply inspect visually up close where applicable before/after each individual pass past any node area; if significant wobbling in cuts &/or misalignments present consider later remedying through following recommended preventative steps already discussed within related chapters earlier – such as manually adjusting guide rollers &/or recheck adjusting tension for proper adjustment tightly yet not overly exerting pressure against side guide mounts(as band blade may snap there!) – which may require some trial&error experimentation but should help overall maintain optimum tracking abilities over time!
Installation of blade
For best performance and safety, the band saw blade must be installed correctly. Loosely fitted blades can cause flying debris, degraded cutting performance, and even machine damage. Read these instructions carefully before installation to ensure efficient and safe operation of your band saw.
First inspect the blade for any visible damage that may have occurred during shipping. Pay particular attention to the leading edge, which becomes dulled with use over time and should be replaced regularly. If any significant issues are noticed after inspection, replace the blade before use.
Make sure that both ends of the blade are securely fastened in place by a tension screw and turn knob or dial on the machine. The tension should be strong enough to prevent slack in the blade but not so strong as to cause distortions. Tighten up all thumb screws according to manufacturer’s instructions.
Next, adjust the tracking wheel tension so that equal amounts of pressure is provided from both sides ensuring a full range of motion when in use. To do this you may need to adjust both tracking wheel studs using an appropriate wrench size depending on your saw model’s specifications found in its manual or online support documentation page. Optimal tracking wheel tension will also ensure a smoother operation when cutting as it reduces side-to-side movement within your cut line/ surface area working space during workpiece rotation operations concerning angled and complex cuts alike.
Finalize setup by double checking materials and components to make sure all nuts & bolts have been tightened correctly before proceeding with projects & tasks!
Adjusting blade tracking
Tracking refers to the process of aligning and adjusting the blade when it is fitted in the band saw. It is necessary to ensure that the blade will run true so that it can cut accurately. Adjusting the tracking is simple, but depending on your particular model, there may be some slight variations.
It is important to make sure that your band saw has adequate tension in the blade before attempting to adjust the tracking. The tension must be within specifications listed by the manufacturer or else you risk breaking or damaging your blade while cutting.
In order to adjust and track your blade, first press its center against a flat table surface and record how far away each end of the blade falls from this surface. To adjust, make use of tracking wheels set at each side of your band saw’s bed—these will be located next to each other near where the back of your machine meets its table assembly. In most cases, blades are adjusted simply by rotating them; turning them clockwise causes them to move towards one side while turning them counter-clockwise causes them to move towards you. Move both wheels at once in either direction until you achieve an even balance between both edges of your blade against a flat surface as recorded earlier—once balanced correctly around its whole length, tighten up clamp screws on each wheel completely and double-check for accuracy one last time before using!

Maintaining and Replacing Band Saw Blades
To keep band saw blades in the best condition, regular maintenance is key. Begin by cleaning the blade after each use with a wire or nylon bristle brush. Be sure to remove dust, wood chips, glue, or other material that may have collected on the carbide teeth or other components. Regular lubrication with a light oil is also recommended; this will help protect against corrosion and reduce wear and tear on the blade. Additionally, inspect blades for damage or missing pieces before each use to ensure safety and proper performance of the tool.
Additionally, each band saw blade will eventually require replacing due to regular wear and tear caused by cutting materials. Before replacing a blade, consider factors like the type of material being cut and desired accuracy of cuts (thin section vs thicker section cuts). When selecting a new band saw blade, consult technical literature from the manufacturer to determine specifics like tooth pitch (TPI), cutting depth (also known as depth of cut), ferrite-nozzle directionality (bi-directional vs uni-directional) etc. Make sure to follow all safety protocols when changing out blades!
Cleaning and Lubrication
Maintaining a band saw blade is essential in order to ensure a longer blade life and proper performance. The following is a list of maintenance tips that all band saw users should consider:
- Clean the wheels, guides, bearings and the other lubricated components on your machine regularly to avoid build up of dirt and debris.
- Avoid contaminating your blades with dirt or rust prevention sprays.
- Apply lubrication frequently to ensure a long life for moving components on your machine such as the blades, bearings and drip boxes when starting up your saw each day.
- Remove any burrs from the teeth using a file – this should be done regularly for optimal performance of the saw blade when cutting material.
- Use coolant, such as water-soluble oil-free coolant if available for cutting non-metallic materials such as wood and plastic – this will prolong the life of your blades by reducing heat buildup during use.
Inspection and Maintenance
To keep your band saw blades in top condition, it’s important to inspect them regularly. Look for signs of wear such as unevenly worn teeth, cracks or chips. Also check for dirt buildup and chipped or cracked welds. If these signs of wear and tear are present, it’s time to replace your blade.
In addition to regular visual inspections, you should also perform the following maintenance tasks:
- Tension adjustment: Check the tension of the blade using a tension meter or other device designed for this purpose. If a manual adjustment is required, use two wrenches to tighten both sides at once for even tension on the blade.
- Lubrication: Oil and grease should be applied periodically along the length of the blade and around moving parts to ensure smooth operation without friction.
- Alignment check: Make sure all guides are positioned correctly relative to each other and that the correct amount of clearance from the wheels is maintained at all times in order to prevent unnecessary accidents.
- Sharpening: Inspect teeth carefully and sharpen them if necessary with a grinding wheel appropriate for your particular type of band saw blade, maintaining a consistent angle while grinding.
Troubleshooting Common Band Saw Blade Issues
Band saws are powerful tools that can make quick work of a variety of projects. However, when experiencing difficulty with band saw operations and results, there’s usually an underlying blade issue. Below are some of the most common problems that can arise with band saw blades and the corresponding remedies to try.
- Dull or worn blades: Expense aside, dull or worn blades can cause frustratingly slow cutting because they require a lot more power and heat to perform the same job compared to a sharp blade. If your cut seems slower than usual or is producing rough edges, it’s time to replace your blade. This can be done by installing a new sharp blade onto your saw or by having an existing blade professionally resharpened depending on the condition of the teeth and the type of material being cut.
- Blunt tips: Even though a standard bandsaw tooth has two alternating cutting edges, sometimes one edge will wear quicker than the other due to variations in home use sawing techniques and materials used for cutting. If one side is blunt then it won’t be able to make as deep a cut as its sharper counterpart on both sides thus leading to poor performance in terms of smoother cuts, burn marks or slag on workpieces etc. This problem can be prevented by regularly checking for blunted tips while in use and replacing blades once this issue occurs as soon as possible so that your cuts stay precise and consistent throughout any project.
- Missing teeth: When too many missing teeth occur within each set along the length of the band saw’s full revolution around it’s wheel circumference then this indicates either excessive pressure between them during operation resulting in breakage/fracture(s) or perhaps a manufacturing defect where those specific segments haven’t been stamped out properly from the metal section used for forming these sets(denticles). In any event if found then quickly replace before continuing with operations again – otherwise you could end up having multiple problems due reduced performance levels due too frequently occurring contacts between workpiece material stock on individual sets taken over time which would increase friction and thus burning effects/poor heat dissipation which produces damage also at either side where these gaps occur along all other reference points besides just missing spots themselves without fail, leading to precise yet timely yields not actually able to obtained through normal expected means possible otherwise using other alternatives applied before their replacements installed accordingly thereafter afterwards initially….
Blade Breakage
When using a band saw, the most common cause of blade breakage is due to pinch points. A pinch point is any area of the blade that is too tight and causes excessive stress on the blade. To avoid these issues, ensure that your table, guides and tension are correctly adjusted before each cut. It’s also important to use a blade guard for even additional protection.
Another common cause of blade breakage is found when cutting hot materials such as aluminum or steel that have been heated from welding or other processes such as hardening or tempering. This can cause increased stress on the saw blades, resulting in failure. When making cuts with hot materials, be sure to limit your cuts and take frequent breaks to allow the material to cool down before continuing further cutting operations. The use of a lower tooth count blade will also help reduce heat build up in this type of situation. Finally, purchasing blades made with high quality spring steel will increase their ability to resist heat damage and premature failure.
Blade Wandering
Blade wandering is a common problem experienced when using a band saw blade. It occurs when the blade shifts movement sideways or up and down while its passing through the saw kerf. This problem usually produces a narrow groove around the cut and will look like an oval in shape—rather than a round circle.
To limit this occurrence, always ensure that the bearings are adjusted properly and that the blade is aligned perfectly with your material before beginning to cut. Also, avoid pushing your material too hard as this can cause instability in the blade while cutting.
When cutting uneven surfaces or any lumps or curves within the material, be sure to take special care to go slow and at an even pace to reduce vibration and wandering of your saw blade. After cutting your material leave some back clearance on the lower side of the workpiece so there is no chance for the teeth catching on it as it exits from under your guide arm/s.
Conclusion
Band saw blades provide a versatile and cost-effective cutting solution for a variety of materials. The blades can be customized to fit specific needs and uses, including specialty applications such as curved and complex cuts. With the right blade in place, band saws are capable of producing accurate cuts quickly, allowing shops to maximize productivity.
When considering which blade will best suit your needs, take the time to consider all of the factors that will impact the accuracy and performance of your machine. Understanding the various options available and how they affect the cutting process is key to selecting the right one for your particular application. With proper care and maintenance, you can enjoy years of reliable performance from your band saw blades.
FAQ’s
How do I know which bandsaw blade to use?
The bandsaw blade to use depends on the type of material you are cutting and the desired cut quality.
What do the numbers mean on a bandsaw blade?
The numbers on a bandsaw blade represent the blade’s length, width, and the number of teeth per inch (TPI).
What are the three main types of bandsaw blades?
The three main types of bandsaw blades are regular tooth, skip tooth, and hook tooth.
Is 14 TPI better than 18 TPI?
The choice of TPI depends on the material being cut. Generally, 14 TPI is better for thicker materials, while 18 TPI is better for thinner materials.
What does 10 14 TPI mean?
10 14 TPI means that the blade has 10 teeth per inch for the first inch of the blade, and then 14 teeth per inch for the rest of the blade.
What is the 4 inch rule for bandsaw?
The 4 inch rule for bandsaw refers to the minimum diameter of a workpiece that can be safely cut on a bandsaw.
What is the best blade speed for a bandsaw?
The best blade speed for a bandsaw depends on the material being cut and the blade’s tooth configuration. A general rule of thumb is to have a blade speed of 3,000 feet per minute.
What does TPI mean on a bandsaw blade?
TPI stands for teeth per inch, which refers to the number of teeth on a bandsaw blade in a one-inch length.
What is the 3 teeth rule bandsaw?
The 3 teeth rule for a bandsaw refers to having at least three teeth in contact with the material being cut at all times.
What is a 6 TPI blade used for?
A 6 TPI blade is typically used for cutting thicker materials, such as hardwoods and metals.
See Also:
- Best skill saw blade
- Best saw blade to cut aluminum
- Best saw blade for vinyl plank flooring
- Best saw blade for melamine
- Best saw blade for mdf